Let Me Show you How to Download an Image from Google Slides
I’ve been there – staring at an image in a Google Slides presentation and wondering, “How do I save this?” If you’ve tried right-clicking and found there’s no “Save image” option, you’re not alone.
The good news? I’ve figured out several easy ways to download images from Google Slides, and I’ll share all of them with you.
Whether you want to use Google Keep, export slides, or even take a quick screenshot, I’ll walk you through each method step by step.
By the end of this guide, you’ll know exactly how to save images from Google Slides without losing quality. Let’s dive in!
Key Takeaways
- I’ll show you how to save images using Google Keep, which is quick and easy.
- Exporting slides as PNG or JPEG files gives you high-quality images.
- You can also extract images by copying them into Google Docs and exporting the file.
- Screenshots are a great option when you’re short on time.
- I’ll include tips for saving images without losing quality.
My Go-To Methods for Downloading Images
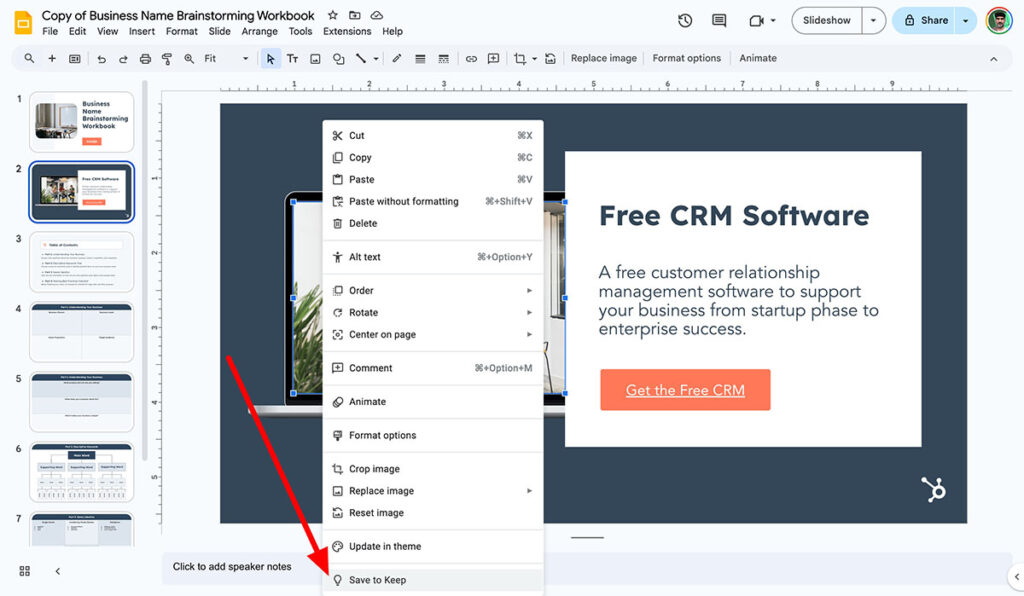
1. Using Google Keep to Save Images
One of the simplest tricks I discovered is using Google Keep. It’s already built into Google Slides, so you don’t need any third-party tools.
Here’s How I Do It:
- Open the Google Slides presentation.
- Find the image I want to save.
- Right-click on the image and select “Save to Keep.”
- This adds the image to a new Google Keep note, which appears on the right side of the screen.
- In the Keep sidebar, I right-click the image again and select “Save image as…”
- I choose where I want to save it on my computer, and boom – it’s done!
Why I Like This Method:
- It’s super quick and doesn’t require any extra tools.
- Perfect when I just need to save one or two images.
What to Watch Out For:
- Sometimes the resolution isn’t perfect, so it’s not ideal if you need super high-quality images.
2. Exporting Slides as Image Files
If I want a higher-quality image – or if I need the whole slide – I’ll just export it as an image file. This method is great when the image is part of the overall slide design.
Here’s What I Do:
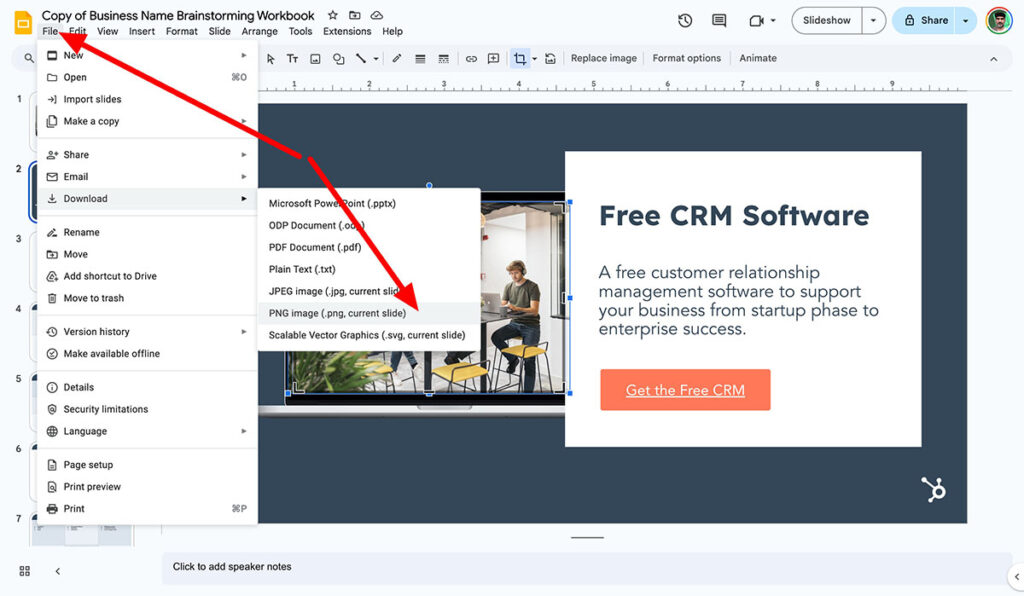
- Open the Google Slides presentation and go to the slide I want.
- Click on “File” in the menu bar.
- Hover over “Download” and pick my preferred format:
- “PNG Image (.png, current slide)” – for high-quality visuals.
- “JPEG Image (.jpg, current slide)” – for a smaller file size.
- The slide downloads as an image file to my computer.
Why I Use This Trick:
- It gives me a high-quality image, which is perfect for printing or sharing.
- PNG files are crisp and don’t lose quality, even when I resize them.
The Catch:
- This method saves the entire slide, not just the image. If I need only part of the slide, I’ll crop it later in an image editor.
3. Copy-Paste into Google Docs
Here’s another workaround I love – using Google Docs to extract images. It takes a couple of extra steps, but it works perfectly when I need higher resolution.
Here’s My Step-by-Step Process:
- In Google Slides, I right-click on the image I want and select “Copy.”
- I open a new Google Docs document.
- I paste the image into the document (Ctrl + V on Windows or Cmd + V on Mac).
- In Google Docs, I click on “File” and choose “Download” → “Web Page (.html, zipped).”
- Google Docs downloads the file as a ZIP folder. I unzip the folder and open the “images” folder inside.
- There’s my image, saved with its original quality!
Why I Recommend This Method:
- It saves the image at a higher resolution than screenshots or Google Keep.
- It doesn’t require any tools other than Google Docs.
Things to Consider:
- It takes a little longer than other methods.
- You need to unzip the folder to get the image, but it’s worth the effort.
Other Tricks I Use to Download Images
4. Taking a Screenshot for Quick Results
Sometimes, I just need a quick image without worrying about the quality. In that case, I’ll take a screenshot. It’s fast, easy, and works on both Windows and Mac.
How I Do It on Windows:
- Open the slide with the image and enter “Present” mode for better clarity.
- Press “Windows + Shift + S” to open the Snipping Tool.
- Drag to select the area around the image.
- The screenshot is saved to my clipboard, and I paste it into an editor like Paint.
- I crop and save the image to my computer.
How I Do It on Mac:
- Enter “Present” mode in Google Slides for a cleaner image.
- Press “Shift + Command + 4.”
- I drag to select the part of the screen with the image.
- The screenshot automatically saves to my desktop as a PNG file.
Why Screenshots Work for Me:
- They’re fast – I can save an image in seconds.
- Perfect when I don’t need ultra-high quality.
The Downsides:
- The quality depends on my screen resolution.
- I sometimes have to crop the image manually.
5. Using Third-Party Tools to Extract Images
If I need to save a lot of images at once, I’ll use third-party tools like Chrome extensions or online extractors.
Tools I Recommend:
- Image Extractor Chrome Extension – It scans a Google Slides file and downloads all the images.
- Online tools like Extract.pics – I upload the presentation file, and the tool pulls all the images for me.
How to Use a Chrome Extension:
- Install the “Image Extractor” extension from the Chrome Web Store.
- Open my Google Slides presentation.
- Run the extension, and it automatically extracts and downloads the images.
Important Note:
- I always double-check the privacy and security of any tool I use. I avoid giving third-party tools access to sensitive files.
6. Saving Images Without Losing Quality
If I really care about keeping the image sharp and clear, I’ve learned a few tricks to make it happen:
- Export slides as PNG files instead of JPEG. PNG images retain quality even after resizing.
- Take screenshots while in “Present” mode to capture images at a higher resolution.
- Use tools like Photoshop, GIMP, or Canva to crop and refine images.
Frequently Asked Questions (FAQs)
Can I download a single image directly from Google Slides?
Unfortunately, Google Slides doesn’t have a built-in “Save image” feature. However, you can use methods like Google Keep, Google Docs, or screenshots to get the job done.
What’s the best way to save high-quality images?
I recommend exporting the slide as a PNG file or copying the image into Google Docs and extracting it from there.
Are third-party tools safe to use?
Some tools are reliable, but I always check reviews and privacy policies before installing any extension or using online services.
Is taking a screenshot a good option?
Yes, screenshots are quick and easy. If you use “Present” mode, you’ll get a cleaner and sharper image.
Final Thoughts
I hope this guide has helped you figure out how to download images from Google Slides using methods that work for you.
Whether you’re saving images with Google Keep, exporting slides, or using screenshots, you now have multiple options to get the job done quickly and easily.
Give these methods a try, and let me know which one worked best for you!


