How To Create a Timeline in Google Slides (Beginner-Friendly Guide)
Timelines can turn confusing data into something visual, simple, and easy to understand.
Whether you’re presenting a product roadmap, class project, company history, or a weekly schedule, Google Slides gives you all the tools you need — no design experience required.
In this guide, I’ll walk you through exactly how to build a timeline in Google Slides.
I’ll also share real examples, tips to avoid common mistakes, and free tools I’ve used over the years when designing slides for clients and my own projects.
If you’re ready to build a timeline that’s clean, clear, and doesn’t take hours to design, this guide is for you.
Why Create a Timeline in Google Slides?

Google Slides is a free, accessible tool that’s perfect for creating quick timelines.
If you’ve never used a timeline before in your presentations, here are a few reasons why they’re so effective:
1. Timelines Make Your Presentation Easier to Follow
Instead of throwing a wall of text on a slide, timelines break down complex sequences — like project phases or historical events — into visual, scannable steps.
2. They Work for Business, Education, and Personal Use
I’ve created timelines to:
- Map out marketing campaigns
- Show team progress during sprint reviews
- Teach class materials with a visual hook
- Pitch startup growth to investors
3. You Don’t Need Extra Software
Google Slides gives you basic drawing, shape, and text tools that are more than enough to create your own timeline from scratch. No need for Photoshop or third-party tools.
4. They’re Easy to Share and Collaborate On
Because Google Slides runs in the cloud, sharing your timeline with others is as simple as clicking the Share button.
Whether you’re working on a group project or co-presenting with a colleague, everyone can contribute in real time — no version conflicts or file transfers needed.
Tools You’ll Use in Google Slides
Here’s a quick overview of the tools you’ll use inside Google Slides when building a timeline:
| Tool | Use Case |
|---|---|
| Line tool | To create the main timeline path |
| Shape tool | To add milestone markers (like circles) |
| Text box | To add dates, titles, and descriptions |
| Fill and border options | To color-code your timeline |
| Guides and rulers | To align everything neatly |
| Animation (optional) | To make elements appear step-by-step |
Step 1: Set Up a Blank Slide
Before you begin designing your timeline, it helps to start with a blank canvas.
To do this:
- Open Google Slides
- Click Slide > Apply layout > Blank
This removes any default titles or text boxes, giving you full control over layout.
You can also click View > Guides > Show guides to help with alignment.
Step 2: Draw the Timeline Line
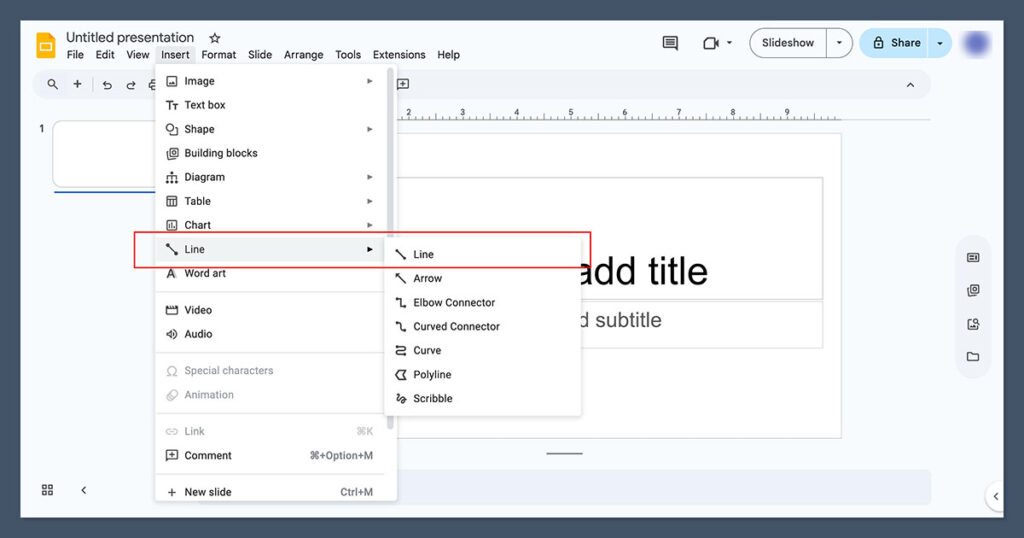
Every timeline starts with a base line — this is the horizontal path that represents your sequence of events.
To draw it:
- Click Insert > Line > Line
- Hold Shift while dragging to make sure it stays perfectly straight
- Place it horizontally across the middle of the slide
Once placed, click the line to:
- Adjust thickness (via the toolbar)
- Change color (use your brand palette or a neutral tone)
Step 3: Add Event Markers (Circles or Shapes)
Now you’ll add points on the timeline to represent events or milestones.
Here’s how:
- Click Insert > Shape > Shapes > Oval
- Hold Shift to make a perfect circle
- Place it directly on the line
- Duplicate the circle (Ctrl + D or ⌘ + D on Mac) for each event
Space the circles evenly to keep things clean and readable. You can adjust the spacing using the arrow keys or drag while watching the snap-to-guide behavior.
Optional Tip: Use rectangles or triangles instead of circles if you want your timeline to stand out more.
Step 4: Add Text for Dates and Details
Each marker needs some explanation — at the very least, a date or label.
Here’s what to do:
- Click Insert > Text box
- Add a short label like “Jan 2025 – Kickoff”
- Place it just above or below the corresponding circle
- Keep your text short and consistent
For more detail, add a second text box under the label to include a brief explanation.
Example Timeline Layout:
| Date | Event | Description |
|---|---|---|
| Jan 2025 | Kickoff Meeting | Align stakeholders, define scope |
| Mar 2025 | Design Phase | Wireframes, feedback, approvals |
| Jun 2025 | Development Begins | Frontend and backend work begins |
| Sep 2025 | Beta Release | Test with internal users |
| Dec 2025 | Public Launch | Launch marketing and go live |
This kind of structure makes it easy for viewers to scan the timeline without needing extra context.
Step 5: Customize the Design
Once your basic structure is in place, it’s time to make it visually appealing — but not overwhelming.
Here’s what I focus on:
- Keep colors consistent: Use 2–3 colors max. Too many colors distract.
- Match fonts to your theme: I recommend Roboto, Lato, or Open Sans for clean presentation-friendly text.
- Align text carefully: Use guides and rulers to make sure everything lines up.
- Highlight important dates: You can bold the launch date or use a different colored circle for it.
You don’t need to be a designer to make a clean timeline. Just follow a few basic design rules, and it will look professional.
Step 6: Add Optional Animations
If you’re presenting live or want elements to appear as you speak, you can animate parts of your timeline.
Here’s how:
- Click on a shape or text box
- Go to Insert > Animation
- Choose “Fade in,” “Appear,” or “Fly in from left”
- Adjust timing using the right sidebar
Animations help pace your presentation, especially if you’re walking through a long timeline.
Note: Don’t animate every element. Stick to a few key points to avoid distractions.
Step 7: Save and Reuse Your Timeline Template
Once you’ve created one timeline, you don’t have to do it again from scratch.
To save your timeline as a reusable template:
- Select all the elements (Ctrl+A or ⌘+A)
- Right-click and choose “Group”
- Copy it into other slides or presentations
- Update the text as needed
If you’re working with a team, you can even save this slide as a Master Slide in your theme so others can reuse it.
Free Timeline Templates for Google Slides
If you’re short on time, you don’t need to build from scratch. I’ve used a number of free timeline templates over the years that integrate well with Google Slides.
Here are a few of my favorites:
| Source | Template Type | Cost |
|---|---|---|
| Slidesgo | Multi-step horizontal timelines | Free |
| Canva | Drag-and-drop timelines (PNG export) | Free / $14.99 Pro |
| SlidesCarnival | Professional business timelines | Free |
| Envato Elements | Advanced timeline templates | $16.50/mo |
| Google Workspace Marketplace | Add-ons like “Lucidchart” for timelines | Free + paid |
You can copy-paste these templates into your slide deck and customize them to match your content.
Common Mistakes to Avoid
Even a good timeline can fall flat if it’s not clear. Here are mistakes I’ve seen (and made) over time:
1. Cluttered Slides
Too many details? Hard to read text? Remove non-essential info. Less is more when it comes to visuals.
2. Poor Alignment
Misaligned shapes look amateur. Use guides and “Arrange > Align” tools to fix this.
3. Random Colors
A rainbow of circles is distracting. Choose 2–3 core colors and stick to them.
4. Fonts That Don’t Match
Mixing fancy fonts with basic fonts rarely works. Use one typeface throughout your presentation.
A well-designed timeline should feel effortless for the viewer to follow. If you find yourself adjusting elements over and over, that’s a good sign to step back and simplify.
Clean spacing, consistent formatting, and clear labeling are what separate an average slide from a truly effective one. Don’t aim for more — aim for clarity.
Timeline Use Cases in Presentations
Still not sure where a timeline fits in your deck? Here are examples from real-world projects I’ve worked on:
In Business
- Launch timeline for a new product
- Milestones in a pitch deck
- Employee onboarding flow
In Education
- Historical events in a unit
- Weekly lesson plan breakdown
- Course development stages
In Marketing
- Campaign schedule with deliverables
- Editorial calendar
- Social media content rollout
Timelines aren’t just pretty — they improve clarity and help teams (or audiences) stay aligned.
No matter the subject, a timeline gives your content structure and flow. It helps connect the dots between past, present, and future in a way that’s easy to understand.
If your presentation feels like it’s missing direction, a timeline might be exactly what ties everything together.
Summary: What You’ve Learned
Creating a timeline in Google Slides is easier than most people expect. Here’s a quick recap:
| Step | What You Do |
|---|---|
| Start with a blank slide | Clean slate, remove distractions |
| Draw a line | Acts as your timeline spine |
| Add markers (circles) | Represent milestones |
| Label with text boxes | Add context like dates or short descriptions |
| Style and format | Use clean fonts, matching colors, and spacing |
| Animate (optional) | Control flow during live presentations |
| Save as a template | Reuse and adapt your timeline in future decks |
If you need a fast, clean, and customizable way to explain events or project stages, timelines are one of the most effective slide designs you can use — and Google Slides makes it easy to get started.
Once you’ve built a timeline that works for you, it’s worth saving a copy to repurpose later.
Whether you’re creating a project plan, lesson structure, or campaign rollout, having a flexible visual format like this can save time while improving how your message lands.